
Arkivalieronline contains the digital collections of the Danish National Archives. There you can access free images of thousands of Danish genealogy records. If you are used to using the FamilySearch image viewer, it probably takes a bit of practice to get used to using the Arkivalieronline image viewer. In this blog post, I provide a guide and some tips, so you can get full advantage of the many images, including those that are not available at FamilySearch.
Overall Composition of the Arkivalieronline Image Viewer
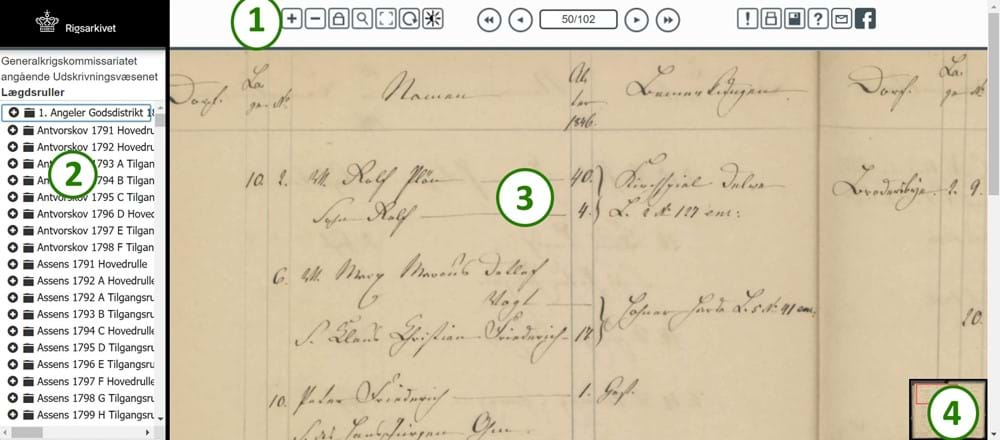
The Arkivalieronline image viewer consists of four parts as shown in the image above. They are as follows:
- The top menu.
- Collection information and image folders on the left.
- The main area where the selected image is shown.
- A miniature of the image in the bottom right-hand corner.

The Top Menu at Arkivalieronline
The image above shows a closeup of the top menu at Arkivalieronline. The icons are used as follows:
Plus & minus: Use these icons to zoom in and out on the image.
Lock: When it's locked, the zoom level will stay the same when you toggle through images. When it's unlocked, the next image you open will be zoomed to fit the window.
Magnifying glass: This icon turns on and off a magnifying glass. When on, you move your mouse to the area of the image, you want to enlarge. You cannot zoom in or out while the magnifying glass in turned on, so may want to zoom in a bit before turning it on.
Framed corners: This icon will open the viewer in full screen mode. Press the Escape key to exit full screen mode.
Circular arrow: Rotate the image ninety degrees clockwise.
Black and white sun: Opens a small tool where you can adjust the brightness (lysstyrke) and the contract (kontrast) of the image. Once you are satisfied with the settings, click Anvend. If you want to reset the image, click Fortryd.
Image number and navigation arrows: In the middle of the menu, you see the number of the selected image followed by a slash and the total number of images in that folder. The double arrow pointing left changes the selection to the first image in the folder. The single arrow pointing left moves you one image backward in the folder. The single arrow pointing right moves you one image forward in the folder. The double arrow pointing right changes the selection to the last image in the folder.
Exclamation mark: This is for reporting errors such as missing or duplicate images. The report form is in Danish.
A printer: Believe it or not that icon is a printer, so clicking it will open a print dialog box.
Floppy disk: Clicking this icon will open the image in a new tab. Then you can right-click it to save it. If you right-click the image directly in the viewer and save it, you will only save the visible part of the image and not necessarily the entire image. Please beware of the download terms.
The question mark: I think it is supposed to lead to a guide, but it leads to the front page of Arkivalieronline.
The last two icons do not work at the moment - at least not on my end.
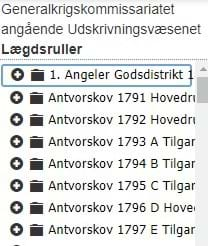
The Collection Information and Image Folders on the Left
On the left-hand side of the screen is a pane with information about the collection at the top and folders with images below that.
The collection is described by the archive creator (arkivskaber) written in normal font and the records series (arkivserie) written in bold font. These two pieces of information are used to search for the collection in the catalog of holdings.
Each record series contains one or more image folders. They are listed below the collection information. Arkivalieronline only lists digitized material. Material that is not yet digitized can be found via the catalog. Many collections are only partially digitized.
If you are used to accessing images via the FamilySearch catalog, a rule of thumb is that the archive creator is the author, the record series is the title, and the folder covers an image group. FamilySearch has organized some collections differently, but in general those are the correlating terms.
You can change the width of the sidebar. Place your mouse cursor on the line between the sidebar and the image so it shows a double arrow. Hold down your mouse button and drag left or right to adjust the size. Unfortunately, some folder names are longer than the maximum allowed width of the sidebar. You can hover your mouse over the folder name to display the full folder name.
Click the plus sign next to the relevant folder to open the list of images within that folder. This is where one of the major differences between the FamilySearch and Arkivalieronline image viewers appears: You cannot see thumbnails of the images at Arkivalieronline. This is a disadvantage when going through large collections, but that's how it is.
You can navigate through images in four ways:
- Use the navigation icons in the top menu.
- Write an image number in the image number field in the top menu.
- Click on an image number in the folder on the left-hand side.
- Use keyboard shortcut keys as follows: The PageUp and PageDown keys will move you one image number backward and forward, respectively. It might seem odd to some that PageUp is backward but remember the structure in the left-hand pane: You go up to go to a smaller image number, and down to go to a larger image number. The Home key will take you to the first image in that folder. The End key will take you to the last image in that folder.
The Main Area Showing the Selected Image
The main area showing the image is where the fun happens. This is where you see the selected image. You can zoom and navigate the selected image in five ways:
- Use the zoom icons in the top menu to zoom in and out.
- Use your mouse roller or mousepad to zoom in and out. There is no need to hold down any keyboard keys while rolling the mouse. Aim you mouse cursor at the part of the image you want to focus on.
- Use your mouse to drag and drop the image to focus on a different part of it. This option is only available when you have zoomed in.
- Use the arrow keys to scroll to a different part of the image – left, right, up, and down.
- Use the miniature image, as explained below.
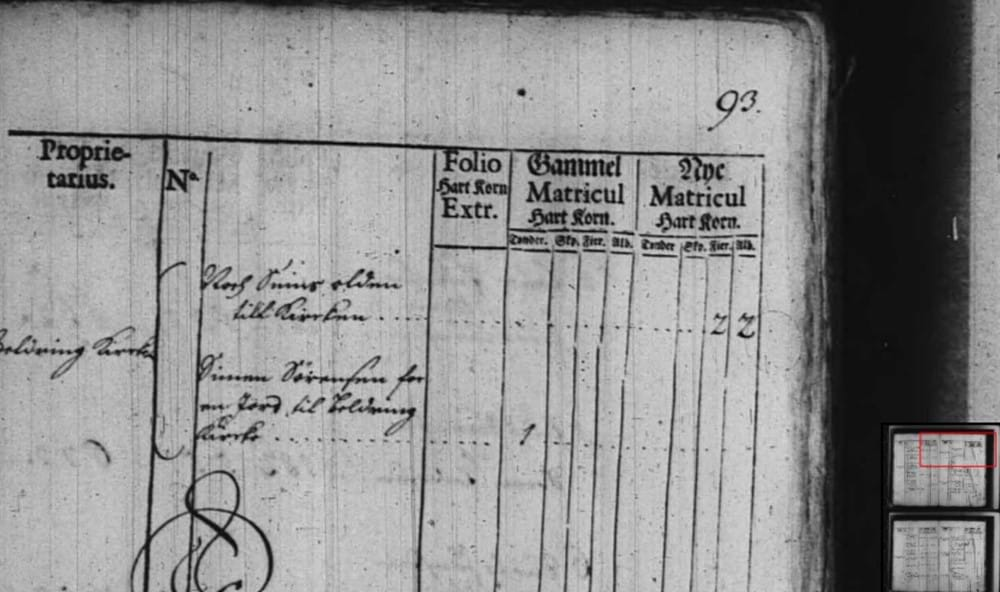
The Miniature Image in the Bottom Right-Hand Corner
The miniature image is not shown when the full image is visible. When you zoom in on a part of the selected image, a red box in the miniature shows the visible part of the image.
You can click on the miniature to navigate to that part of the image.
I rarely use the miniature image. To me it is only helpful when I come across a collection where more than one page spread is digitized as one image. You will rarely come across that, though. In the image above is an example thereof from the 1688 cadaster books. If you look at the miniature image, you can see that the image contains two page spreads. Most images contain one page spread.
How To Save the Link to the Image
To save the link to the image, you must copy the URL from the address bar of your browser. Copying the URL saves the image number, too. Beware that if the website is fundamentally changed, new images are added to the collection, or duplicate images are removed, the link may change. That is one of the reasons why writing a source citation is recommended.


