The snippet above shows my second great-grandparents, Anders Hvissendal Kristiansen and Ane Margrethe Alvilde Andersen in the 1916 census. They lived in Neder Julianehede from about 1916 until they died in 1981 and 1974. The 1916 census says they lived at "Matr. N." 2y (short for matrikelnummer, meaning cadastral identification number). We will find that lot on a map from about 1916 and we will also find today's address of that lot, so we can see whether the building still exists today.
This website has digital images of historical maps, which you can access and download for free: https://hkpn.gst.dk. The site is only available in Danish, but learning how to use it, is worth the effort.

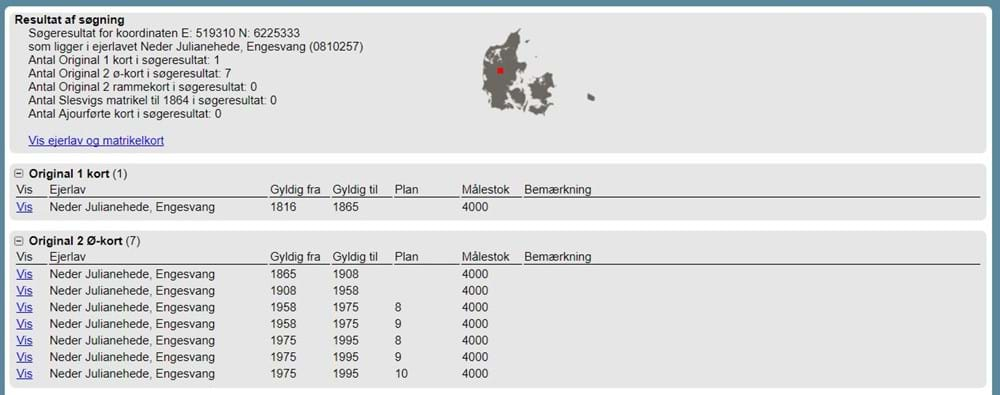
The site is divided into tabs. The default tab is where cadastral maps are found and that is where we will do this search. You need to type the name of the ejerlav (real property area), which is most often equal to the place name. As you start typing in the search box, options will be shown to assist you. A parish covers more than one ejerlav, so you need to type the place name and not just the name of the parish (in some cases the place name is the same as the name of the parish). Neder Julianehede lies in Engesvang Parish and when I start typing, that option is shown. When I choose it, the results are listed below, arranged by type of map, as shown in the snippet below.

You should not worry about the types of maps, but rather focus on the columns with the validity years, Gyldig fra (valid from) and Gydig til (valid to). In this case, I want to find the map, which was valid in 1916. That is the second of the listed Original 2 Ø maps. Clicking the word Vis in the first column of that line will open the image of the map in a new window. It may take some time to load, because they are good quality scans. I recommend that you enlarge the window, because we need to zoom in and navigate on the map to find the right lot.
You change navigation method by clicking the symbols in the control panel in the upper right-hand corner. You can only click the symbols, when the map is fully loaded, so you need a bit of patience. You can move the box with the navigation tool, if it gets in your way. The navigation options are:
- Magnifying glass with a plus sign: Zoom in
- Magnifying glass with a minus sign: Zoom out
- Four-way arrow: Pan the map
- Two-way arrow forming a circle: Turn the map
- Globe: Show the entire map
When you want to zoom in or out, you click the map, hold in the mouse button and drag to make a square. When you want to pan the map, you click the four-way arrow and drag the map in the desired direction. Once you let go of the mouse button, the map needs to load, before you can interact with it again. If you are too impatient, scroll down to the next paragraph to see how you save the map to your computer.
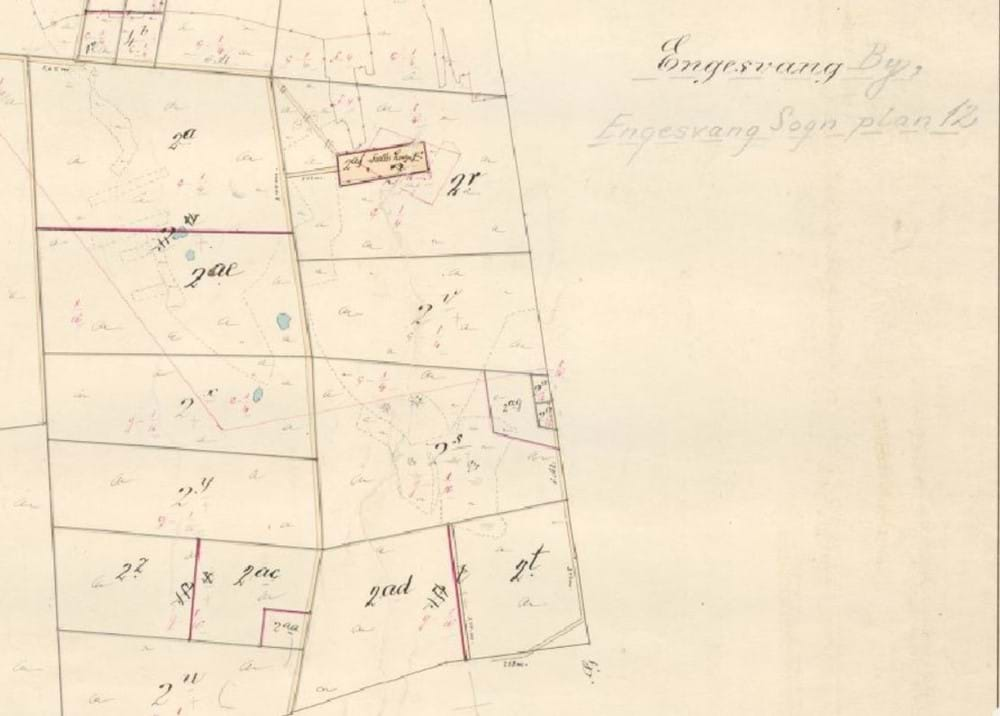
Zoom in on a part of the map and pan to find the right lot. A cadastral id number may cover more lots, so you need to check the entire map to find all of the property. I found number 2y in the lower right-hand corner of the map.

In this map, the buildings are not shown, but you can see lakes, streams and roads. You can also see the clay pits in the area. Clay pits were most often joint property. The clay was used for plastering the walls and for making bricks. The nearest clay pit for Anders was at lot 2af (a few lots above lot 2y). The owner of lot 2r had the clay pit in the middle of his lot, so he had to accept that others drove through his property to get to the clay pit. On the other hand, he could walk to and from the clay pit.
Saving the Map
To save the map, click the menu item Kopi (copy) and choose to save a section of the map as a PDF (PDF (Udsnit i viewer)) or as a JPG image (JPG (Udsnit i viewer)) or save the entire map as a JPG image (JPG (Hele kortet)). I recommend saving the entire map as a JPG image and then you can use your own software to save a section of it, if you want to. The maps may consist of more than one JPG file. They are saved as one zip file. You may have to accept before saving, depending on your browser settings.

Finding the Address
We really want to know the address of the place, so we can see if the building still exists.
To search by cadastral id number, you need to type in the name of the municipality. The easiest way to find that is through the Danish Wikipedia site at http://da.wikipedia.org/wiki/Forside. Search for the name of the parish followed by the word sogn (parish), in this case Engesvang Sogn. The structure of this kind of page is the same for all Danish parishes, so you do not need to understand Danish to find the name of the municipality. The second sentence reads "Sognet ligger i Ikast-Brande Kommune." Kommune means municipality, so the name of the municipality is Ikast-Brande.

Having all the needed information, we go to the public information server at http://www.ois.dk
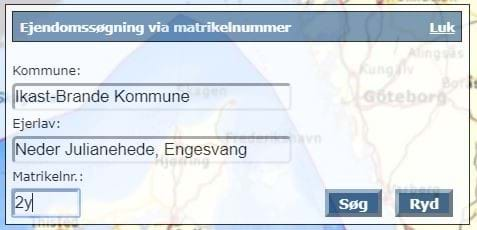
You have several search options. To search by cadastral id number, click the orange box in the left-hand menu. A search box appears in the middle of screen. In the first box, you type the municipality. In the second box, you type the ejerlav (property area) and in the last box, you type the cadastral id number. Finally type enter or click the search button - Søg. If the desired number does not show on the list of suggestions, then the lot is no longer a separate lot with a separate address. I will deal with that issue in a later part of this tutorial series.

The search turns up a screen with a lot of information. The top row in the left-hand pane shows the address: Krattet 19. In Denmark, we write the street name before the house number. All lines with pluses or minuses in the left-hand pane can be expanded or collapsed to show more or less information. To see the full postal address, click the line beginning with the words BBR-Grund. In the right-hand pane, the postal code and postal place name is on the line called Postnr./-by, in this case 7442 Engesvang.
When you clicked the BBR-Grund line in the left-hand pane, the item expanded and now shows the buildings Bygning 5 and Bygning 7. Each building has a number and this list reveals that there used to be more buildings on this lot. By clicking the line for a building, the information about the building is shown in the right-hand pane. Line 11 Opførelsesår shows the year when the building was built. Building 5 was built in 1965, building 7 in 1937. This means that my second great-grandparents lived in the existing buildings. Many buildings from the 1800s still exist, so I am not just lucky because there are twentieth century buildings.

Come Back to Learn More
The best way to get to know these websites, is by using them. If you are not looking for a specific lot number right now, choose a random ejerlav and a random lot no. to try it out. In another part of this tutorial series, I will show how to find the lot, when you do not know the lot no. I will also dig deeper into the information listed at the public information server website. Please leave a comment, if you want me to explain specific parts of these websites.


